Our sixth match of the season was an away match against Horfield & Redland B on 3rd December. In large part because this match was the week before the examination week, we were running low on players, but Tommy and James eagerly agreed to play as subs from the A Team.
To aid in his preparation for the match, James contacted one of our former players to ask for the PGN of a game they played with the correct colour against one of James’ potential opponents. However, James forgot that the player he asked had in fact recently joined Horfield & Redland Chess Club after finishing university, meaning that James had just, rather amusingly, explicitly told a member of the opposing team that he was playing in the match and implicitly on which board. After a few days, to our surprise, James was graciously sent the PGN he requested and, as far as we know, news of James’ error did not reach the other players before the match.
With that pre-match hilarity resolved, the match commenced smoothly. I’ll cover the games in the order that they finished.
Board 4
Samson had Black on Board 4 and his game started with the London System. He opted for a queenside fianchetto setup and, while his position looked uncomfortable early in the game, he correctly assessed that he was completely fine objectively.
In the above position, however, Samson played the inaccurate 14… b5, which locks in the light-squared bishop but allowed White to open up the c-file with 15. a4 b4 16. cxb4 cxb4. As a result of the opening up of the file, White’s next move 17. Ne5 became much stronger than it would otherwise have been. This is because 17… Qb6 walks into 18. a5 and White can apply pressure down the c-file with Rc1 at any moment.
The pressure exerted on Samson’s position by 17. Ne5 was so significant that the only way to stay in the game objectively is with 17… Nxe5. This move is easy to dismiss immediately because it looks like it just loses an exchange, but White should in fact not even play 18. Bxe8, due to 18… Ng6. White has nothing better here than the desperado 19. Bxf7+, giving Black two knights for a rook and a pawn. If instead White tries to save the bishop with 19. Bc6, Black can successfully win it at the cost of a pawn with 19… Nxf4 20. exf4 Rc7 21. Rc1 Qc8 22. Qc2 b3 23. Qc3 Ne4, at which point the queen is forced to leave the c-file and abandon the bishop. Because of that, White should play 18. dxe5 instead, attacking the knight on f6 while the rook is still hanging, but this fails to win material since Black can simply play 18… Nd7 to simultaneously eliminate both threats. None of this happened, however, since Samson played the logical move 17… Rf8, unpinning the knight on d7. Unfortunately, this loses a rook to 18. Bxd7 Nxd7 followed by the devastating triple fork 19. Nc6. Samson decided to keep the bishop defended with 19… Qe8 and then try to win back the knight for the rook after 20. Nxa7 with 20… Qa8. However, this plan was unsuccessful because White found the crushing move 21. Rc1.
If Black simply plays 21… Qxa7, there’s 22. Rc7, forking the queen and the knight on d7, so Samson understandably resigned here, since it is highly likely that the knight on a7 will escape entirely if it cannot be captured immediately. This game was certainly an indication of how tough it would be to even get on the scoreboard in this match, but there’s of course always a chance until there isn’t. The day after this match, however, Samson bounced back with a smooth win for the A Team.
Board 5
Jake had White on Board 5 and his game started with the Wing Gambit in the Sicilian Defence. Before long, Jake’s position resembled the Advance Variation of the French Defence but a much worse version, since he had intentionally sacrificed a pawn in the opening and Black’s light-squared bishop is outside the pawn chain. Because of this, Jake’s position was already on the ropes after 7… Qb6.
The best option for White in the above position is 8. Be3 to ensure that the fundamental d4 pawn remains sufficiently defended. However, this at least temporarily loses the a3 pawn to 8… bxa3 because 9. Nxa3 loses to 9… Bxa3 10. Rxa3 Qb4+, forking the king and the rook, so Jake opted for 8. 0-0 instead, surrendering the d4 pawn to 8… Bxf3 9. Bxf3 Qxd4 10. Qxd4 Nxd4. This soon left him rather unpleasantly down 2 pawns and with doubled f-pawns, but he was able to win one of the pawns back and enter an endgame with a rook each, same-coloured bishops, and some pawns. While this endgame was definitely still losing, Jake generated counterplay with 26. Rb7+, which sets a devious trap.
In the game, Black fell for the trap and blundered the bishop with 26… Ke6 because of the cool tactic 27. Rxe7+ Kxe7 28. Bxc5+, forking the king and the rook and winning the bishop overall. The only move for Black that doesn’t lose this way is 26… Kd8, since 27. Bxe7 is not a check so Black doesn’t have to take back immediately. Despite Black’s blunder, the game was far from over, because Jake had to give up the e5 pawn in order to win back the rook, so he was left with only 3 pawns compared to Black’s 4 pawns, and of course his f-pawns were doubled. This gave Black serious drawing chances and, in fact, the position quickly became objectively drawn. Black’s final opportunity to draw the game came after 35. Ba3.
Black wanted to hold onto the passed d-pawn so 35… f5 was played in the game, but 35… Kxf4 leads to a relatively straightforward draw because Black just needs to eliminate the final 2 pawns to draw, and Black’s pawns can easily take care of one pawn if the other falls. The only way to keep both pawns defended for the time being is with 36. Bd6+ Kf3 37. Bg3, but then 37… g5 threatens 38… h4, which would force the bishop to relinquish its defence of the f2 pawn. The best winning attempt for White is 38. h4 but 38… gxh4 39. Bxh4 f5 40. Kxd3 allows Black to attack the bishop with 40… Kg4. The bishop needs to monitor the h-pawn so it is forced to eventually relinquish its defence of the f2 pawn, since the White king on e3 cannot move to defend f2 when the Black king lands on f3. The final try 41. Bg3 also just leads to a draw because of 41… f4 42. Bh2 Kf3, at which point there is no good way for the bishop to defend the f2 pawn. However, of course 35… f5 was played in the game instead of any of that and Jake proceeded to demonstrate excellent technique, preserving one of his pawns, blockading both of Black’s remaining pawns, and forcing his opponent into zugzwang so that he could win Black’s pawns, at which point Black resigned. This was a huge win for Jake, since, despite the fact that I am certain that Jake is better than his classical rating, this was officially a 416-point upset, by far the biggest of the season so far.
Board 3
I had Black on Board 3 and my game started with the Scandinavian, which I knew my opponent plays but firstly I thought it was unlikely we would play and secondly I thought the French was more likely if we did. As one would expect in a Scandinavian, I got a pleasant position early on which closely resembles a Two Knights Caro-Kann, an opening in which I have a lot of experience, so I tried to play it in a similar way. However, because I’d already castled short, I couldn’t do my usual plan of an all-out kingside attack, so I decided to expand on the queenside with 13. a4, which sets a trap.
I figured one of the most natural ideas for Black in the above position is 13… Qb6, attacking the weak b2 pawn, but I correctly evaluated that this is bad for Black because of 14. a5, which forces 14… Qd8. If Black gets greedy and plays 14… Qxb2, the queen is trapped after 15. Rdb1 Qxc2 16. Bd3 Qd2 17. Bf4, which works because if the knight on c3 is ever taken, there’s Bxh7+. However, my opponent didn’t even begin to fall for that and instead played 13… a5, so the game continued. Before long, my opponent started to exert significant pressure down the d-file and I failed to consolidate in time, so my pieces rather quickly found themselves awkwardly-placed in an attempt to hold everything together. This pressure became too much for me after 20… Nd7.
This creates the threat of 21… Nc5, which would win an exchange because the d-pawn is pinned. While I stopped this threat with 21. Rg3, this allows Black to win the d4 pawn by force with 21… Nf6, since after 22. Qf3 Qxd4, the queen defends the knight so 23. Qxf6 is not a thing as I had hoped. With the loss of my most important pawn, my position collapsed, but I saw some tricks that were theoretically possible for my opponent to miss so I kept playing. I prepared my final trick with 29. Kh2.
The bishop is of course doomed, but if Black admittedly unnaturally plays 29… Qxd1, the position is an easy draw for me with 30. Qxf6 g6 31. Rxg6+ fxg6 32. Qxg6+ because I have perpetual check, but of course my opponent would never realistically blunder this so 29… Rxd1 was played instead. I resigned here because 30. Qxf6 gets mated immediately by 30… Qh1# and I’m down a piece and a pawn otherwise. Despite the 1-2 score thus far, I still considered the match to be going better than expected, since this was certainly not a match that I considered winnable in advance, but of course a final score of 1-5 was still possible at this point.
Board 6
Argi had Black on Board 6 and his game started with the Bishop’s Opening, which eventually transposed into the Giuoco Piano. Shortly after the opening, White achieved a strong centre and looked to be in good shape, despite Argi’s well-placed and symmetrically-positioned bishops.
In the above position, Argi played 15… d5, which led to a rather unpleasant position for him after 16. Ne5 Qd8 17. Nxg6 Nxg6 18. e5 Nh7, since h7 is not exactly the ideal square for a knight. White proceeded to launch a kingside attack, and Argi eventually correctly sacrificed the exchange for a pawn. While the position certainly still looked unpleasant at this point, Argi had successfully erased White’s advantage objective.
However, Argi understandably captured the hanging pawn here with 29… Bxe5, which objectively loses to the deflection tactic 30. Rxb7, since 30… Qxb7 loses the bishop and the knight to 31. Qxe6+, so Argi had nothing better than to allow a queen trade with 30… Qf6 and accept being cleanly down an exchange after 31. Qxf6 Bxf6 32. Bxa7. Instead of capturing the hanging pawn, the best move and the only move that doesn’t lose is 29… Bc3, attacking the rook on e1 and crucially making it so that 30. Rxb7 is not losing for Black because 30… Qxb7 31. Qxe6+ doesn’t win the Black bishop as it does in the other line. If White plays the other natural move 30. Rec1, Black simply has 30… d4 to defend the bishop. Regardless, in the game, down an exchange, Argi tried everything he could to defend a knight vs rook endgame with pawns, and he set a clever trap with 48… gxh4.
If White takes the hanging knight with 49. Kxf4, the d-pawn promotes by force, leading to an interesting objectively equal queen vs rook and 3 pawns endgame where anything could happen. However, White didn’t fall for this trap, playing 49. g5 instead, and again didn’t fall for the trap after 49… h3, playing 50. g6. With that, White had succeeded in avoiding every trap Argi could set, so Argi resigned soon after, but his resilience and resourcefulness in the endgame are certainly worthy of much credit.
Board 1
Tommy had White on Board 1 and I should preface this game by saying that it would be easy to write a full book about this game due to the extreme complexity of every position. His game started with the Latvian Gambit, which he knew his opponent plays, so he had a rare system prepared against it. The position became exceedingly complicated in the opening, resembling a King’s Gambit with colours reversed. On only move 8, a piece was correctly sacrificed with 8… Nxf2.
While Tommy enjoyed an objective advantage in the early middlegame, Black, despite being down a piece for a pawn, ended up objectively better after meeting 18. a4 with 18… a6. Tommy’s position started to get uncomfortable as a result, but he understandably thought that Black’s position was still in dire straits objectively. After 19. Na3 Na5, Tommy was forced to play the awkward move 20. Nc1, but Black found the brilliant sacrifice 20… Rxf1+ here.
This sacrifices the exchange to get surprisingly potent counterplay after 21. Rxf1 with 21… Bxh3. In fact, after Tommy saved the rook with 22. Rf2, Black missed a win, since 22… Bxa3 23. bxa3 Nc4 24. Qe2 Bg4 forces the queen to relinquish its defence of the bishop on e3. However, Black played 22… Qg4 instead, so the game continued with an advantage for Tommy. Amusingly, Black lost the queen soon after with 24… Bxa3, completely missing Tommy’s 25. Rf8+, but this is in fact the top line for Black, since Black continued to have a lot of counterplay due to getting a rook and a knight for the queen. Sure enough, Tommy lost all of his advantage with 30. Rxb7 because 30… Rf1 left him on the verge of getting mated by Black’s swarm of pieces around his king. Unfortunately for Black, Tommy found the only move 31. Qxc7, sacrificing the knight on c1 to create strong mating threats of his own. After 31… Rxc1+ 32. Kb3, there is only one move for Black to draw, but this draw is insanely hard to find, especially considering Black only had 30 seconds on the clock in which to find it.
This insane drawing line is 32… Bd1+ 33. Ka2 Rc2+ 34. Ka1 Rc1+ 35. Rb1 Bb2+ 36. Ka2 Bb3+ 37. Kxb3 Rxc3+ 38. Kb4 a5+ 39. Kc5 Nd2+ 40. Kxd5 Rxc7 41. Rxb2, so, needless to say, Black didn’t find this and instead played 32… Rb1+, which lost all hope of saving the game, so Black resigned soon after. This was a fantastic win for Tommy, a 256-point upset, and this maintained his perfect score as a B Team sub with 3/3. It also meant that Jake’s record of the highest-rated player defeated in a B Team match this season only stood for about an hour.
Board 2
James had Black on Board 2 and his game started with the Réti Opening, which transposed into an English. Early in the game, White played the inaccurate 12. Qc3, which allowed the clearance sacrifice 12… d4 with the idea that 13. exd4 is met with 13… Nfd5. The resulting position is unclear, however, so James instead played 12… Ne4 with a similar idea and still enjoyed somewhat of an advantage after 13. Qxe5 Qxe5 14. Nxe5. Apparently James then should have kicked the knight on e5 back with 14… f6 and the bishop back with 15… a6, but he instead played the obvious move 14… Nxc2+, forcibly winning an exchange for the pawn.
However, the above position is objectively equal because after 15. Ke2 Nxa1 16. Rxa1, White has the bishop pair and more activity as compensation for the material. After some manoeuvring, the momentum started to shift in White’s direction due to White’s bishops ending up on fantastic diagonals and White’s knight finding an excellent outpost on d4.
White continued to press and eventually obtained a considerable advantage, despite still being down material, with a passed e-pawn and a lot more space, since James’ pieces at one point were confined to the 7th and 8th ranks. While James was able to eliminate one of the bishops, this gave White a passed c-pawn, so his position appeared to be on the ropes, but there was a brief moment of objective equality after 50. Nf3.
This threatens the fork 51. Ng5+ and the best way to avoid this is with 50… Ree8, but it is not at all clear that this is good, so James instead tried to stop the threat by pinning the knight with 50… Rh3. Unfortunately, White has 51. Kf2 here, unpinning the knight, and now 51. Ng5+ would fork the king and both rooks, and of course there is no way to save two of them in one move, so James was forced to give back the exchange. As a result, White traded into a same-coloured bishop endgame and James could do little to stop White’s 3 passed pawns, so he resigned, concluding a valiant effort by our team in the match overall.
Summary
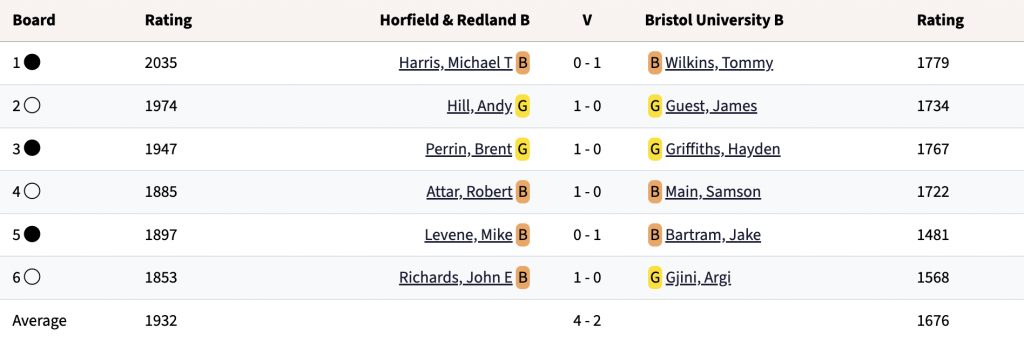
In the end, considering how tremendously we were outrated, we lost the match with an excellent 2-4. Against such a strong team, losing every game was very much a possibility. We expect most teams to not field all of their strongest players against us because we are the underdogs in most matches, but as a matter of fact, with an average rating of 1932, the team that Horfield fielded (no pun intended) for this match were the strongest team fielded in Division 2 since Clevedon A against Thornbury in March last season. Therefore, winning 2 games is a fantastic result so very well done to Tommy and Jake. Our next match and final match of the term is a home match against Bath B on 12th December, so the next match report will be posted soon after that.